
Step-by-Step Guide: Customizing Your MS Excel Dropdown Menu

Step-by-Step Guide: Customizing Your MS Excel Dropdown Menu
Quick Links
- Edit a Drop-Down List From a Table
- Edit a Drop-Down List From a Cell Range
- Edit a Drop-Down List Manually
Drop-down lists in Excel make for a simplified way to enter data, but sometimes you may need to edit that list. You can add or delete items from your drop-down list regardless of how you created it.
You may have used a table, named cell range, or manual setup for your drop-down list. We’ll show you how to edit your list accordingly.
Edit a Drop-Down List From a Table
The nice thing about using a table in Excel for your drop-down list is that the list updates automatically when you make changes to your table.
Related: How to Create and Use a Table in Microsoft Excel
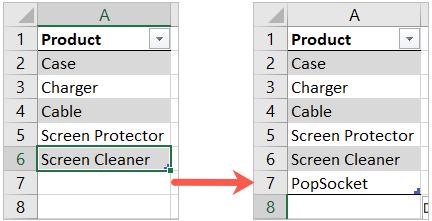
To add an item, go to the last row in the column, press Enter or Return, enter the new list item, and press Enter or Return again.
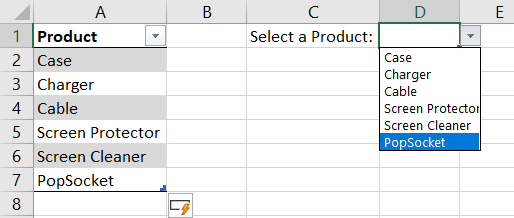
When you select the drop-down list, you’ll see the additional item in the selection.
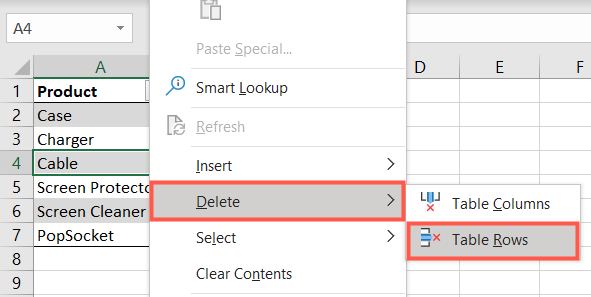
To remove an item, right-click and choose Delete > Table Rows. This removes the item from the table and the list.
If you simply delete the text in the cell, this will leave a space in your drop-down list. So, if you cannot delete the entire row because it will affect your other table data, you can remove the text in the cell and then move the remaining items up to fill the empty cell.

Edit a Drop-Down List From a Cell Range
You might use a cell range or a named range for the items in your drop-down list, which is a handy way to go. Here’s how to add and remove items from your list.
Related: How to Assign a Name to a Range of Cells in Excel
Add an Item to a Cell Range
To add a list item, simply enter it below the existing items. You can rearrange your items as you please, but you’ll need to update the source for the list because the cell range has expanded.
Select the cell containing the drop-down list, go to the Data tab, and select “Data Validation” in the Data Tools section of the ribbon.

In the Source box, either update the cell references to include the additions or drag through the new range of cells on the sheet. Click “OK” to apply the change.
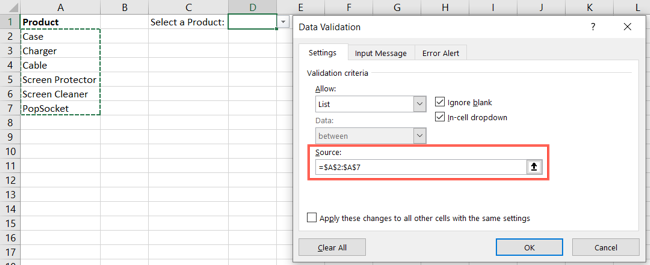
Optionally, check the box at the bottom if you use the list in more than one place and want to update it throughout.
Add an Item to a Named Range
If you use a named range for your list items, you can use the above method to add an item to the list. However, this will not update the named range to include the additional item. Instead, update the named range.
Go to the Formulas tab and select “Name Manager” in the Defined Names section of the ribbon.

When the Name Manager opens, select the named range and update the cell references in the Refers To box at the bottom. You can manually adjust the cell references or simply drag through them on your sheet. Click the checkmark to the left of that field to save your changes and hit “Close.”
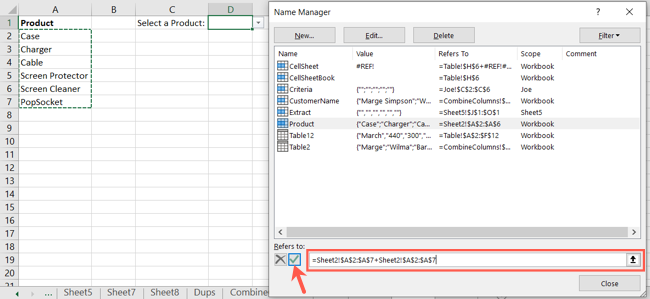
Your drop-down list automatically updates to include the new list item.
Remove an Item From a Range
Whether you use a named range for your drop-down list or a cell range without a name, removing an item from the list works the same way.
If you use a named range, you may want to update the cell references as described above.
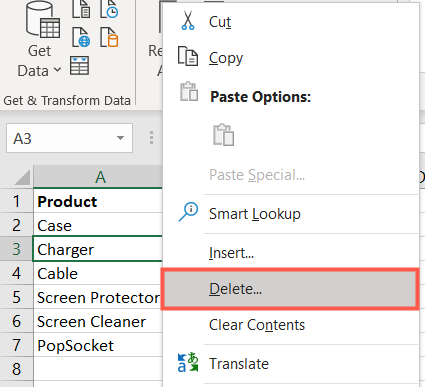
To remove a list item in the cell range, right-click and choose “Delete.”
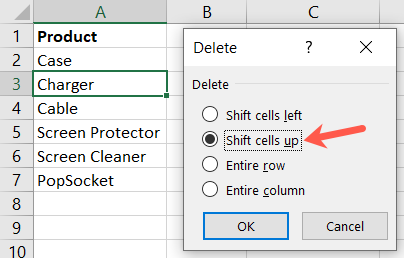
When prompted, select “Shift Cells Up” and click “OK.”
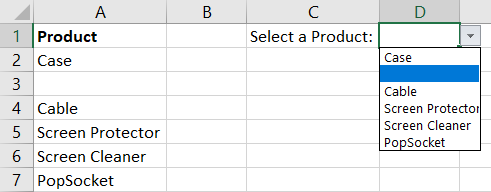
If you simply select the cell and delete the text in it, you’ll see a blank space in your list as shown below. The above method eliminates that space.
Edit a Drop-Down List Manually
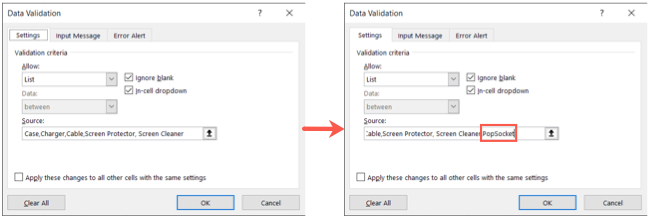
If you entered your list items manually in the Data Validation box rather than referencing a table or cell range, you can simply add or remove list items in that same spot.
Related: How To Restrict Data Input In Excel With Data Validation
Select the cell containing the drop-down list, go to the Data tab, and choose “Data Validation” in the Data Tools section of the ribbon.

In the Source box, add new list items to the list or remove the ones you no longer want. Click “OK” and your list will be updated.
Just because you add a drop-down list for data entry in Excel, doesn’t mean you can’t make changes to it when needed. For another option, you can set up custom lists in Excel to use anytime.
Also read:
- [New] In 2024, Embrace the Art of Timelapses A Comprehensive iPad Tutorial
- [New] Precision Problem-Solving for Social Media Stories Issues
- [New] Ranking 9 Premier Video Call & Meeting Apps iOS vs Android Reviewed for 2024
- [Updated] Mastering User-Generated Content Music Posting on Instagram
- [Updated] Navigating Through LinkedIn Account Termination Procedures for 2024
- [Updated] Spotlight on 10 High-Speed Growth Titles to Inspire You
- 2024 Approved Resizing Imagery on iPhone Without Hassle
- Download & Latest Updates for NVIDIA GeForce RTX 3070 Drivers on Windows 11 and 10
- Ensuring Seamless Sleep in Windows 11
- Enunciate Elegance: Tongue Twisters for Improvement
- Insignia Bluetooth Adapter Driver Download and Update in Windows
- Intel's Serial Interface Driver: Free Download and Quick Install Steps
- Solved Issues with Life Is Strange: True Colors Performance Hiccups
- Title: Step-by-Step Guide: Customizing Your MS Excel Dropdown Menu
- Author: David
- Created at : 2024-10-15 16:42:28
- Updated at : 2024-10-20 17:06:52
- Link: https://win-dash.techidaily.com/step-by-step-guide-customizing-your-ms-excel-dropdown-menu/
- License: This work is licensed under CC BY-NC-SA 4.0.