
Microsoft Excel Guide: Adjusting Dates by Removing a Year

Microsoft Excel Guide: Adjusting Dates by Removing a Year
Quick Links
There are a couple of ways you can remove the year from a date shown in Microsoft Excel. You can use custom cell formatting to hide it or use various functions like CONCATENATE to remove it completely. Here’s how.
Custom Number Formatting
While a date value in an Excel cell is technically a number, Microsoft Excel uses a particular type of formatting to display it. The same is true for currency values, where currency symbols are added to values to show that they relate to money. When you add a date in Excel in a format that it recognizes, Excel automatically changes the cell number format to the “Date” type.
You can customize this type to display the date value in different ways. For instance, you can switch between “11/02/2021” (in the DD/MM/YYYY format commonly used in the U.K.) and “2021-02-11” for 11 February 2021.
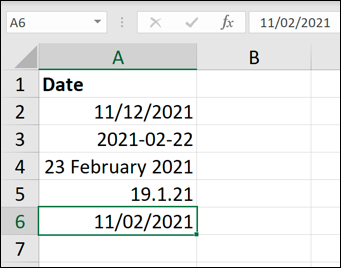
You can customize this number format, however, to remove the year entirely from view. The value itself won’t change, but Excel won’t show the year value thanks to custom number formatting.
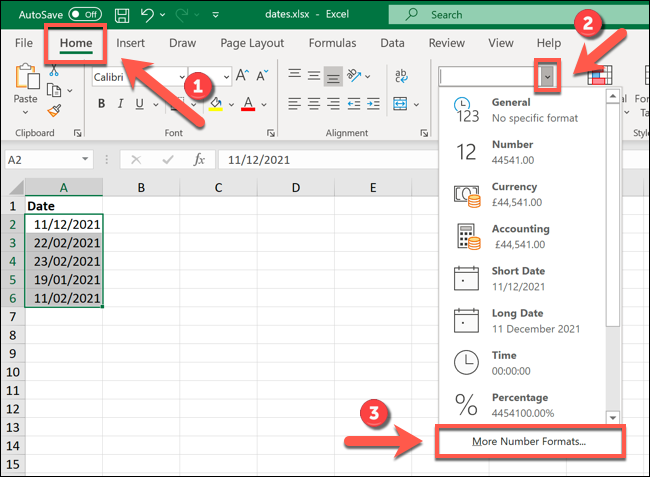
To do this, highlight the cells containing your original date values, then select the “Home” tab on the ribbon bar. From there, select the arrow next to the number format drop-down menu and choose the “More Number Formats” option.
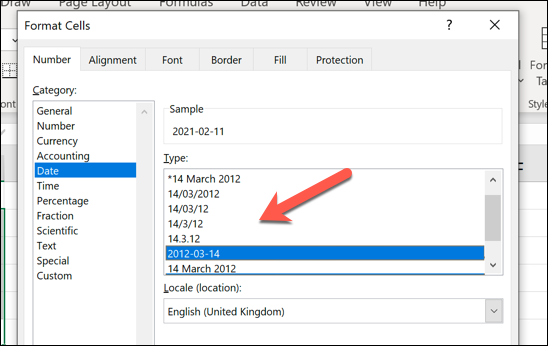
In the “Format Cells” menu, select a style of formatting that you like from the “Date” options provided. Once that’s selected, choose the “Custom” option.
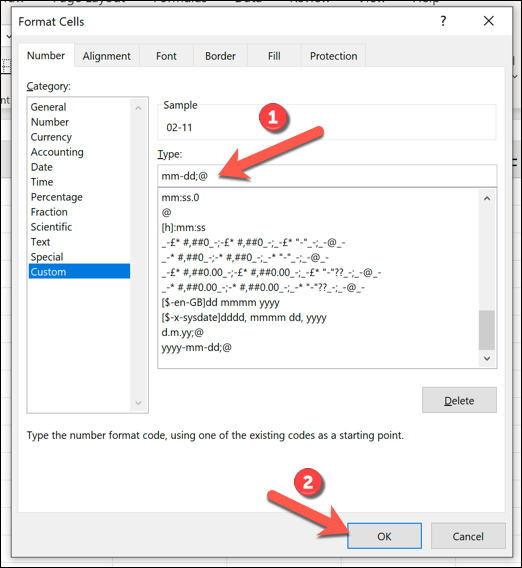
In the “Custom” option, you’ll see the date number formatting style shown as text in the “Type” box. For instance, “11/02/2021” would show as “dd/mm/yyyy” in this box.
To remove the year, make sure to remove any references to “yyyy” or “yy” in the “Type” box as well as any surplus delimiters, such as a dash or forward slash. For instance, “11/02/2021” would require you to remove “/yyyy” from the “dd/mm/yyyy” type box, leaving “dd/mm” in place.
Once you’ve made your changes, select the “OK” button.
Changing the cell number type will hide the year, but it won’t remove it. If you want to restore the year, change your cell number type to a date type that includes the year again.
CONCATENATE Function
Concatenation is a term that basically means to link or combine two or more pieces of data. In Microsoft Excel terms, concatenation can be used to add various text strings, numbers, or cell values together in a new cell.
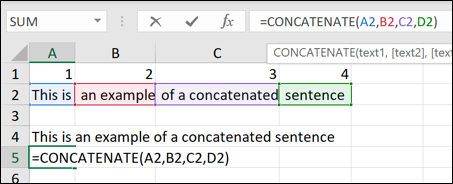
If you want to remove the year from a date in Excel, you could combine the output from two functions (such as DAY or MONTH) together using CONCATENATE. Rather than hiding the year from view using custom number formatting, CONCATENATE (with DAY and MONTH) allows you to create a separate value that doesn’t include the year at all.
To do this, open an Excel workbook containing your date values, or create a new workbook and place date values in separate cells. To use CONCATENATE with DAY and MONTH, insert a new function using this structure, replacing the cell reference (A2) with a reference to the cell containing your date:
=CONCATENATE(DAY(A2),”/“,MONTH(A2))
The values returned by DAY and MONTH are separated by a special delimiter character, such as a comma or slash, to show that the returned value is a date. Each value (DAY, the delimiter, and MONTH) are separated by a comma in the CONCATENATE function.
In this example, cell A2 contains a date value (11/12/2021) in the DD/MM/YYYY format. Using CONCATENATE with DAY and MONTH, the day (11) and month (12) from the date value in A2 are placed in another cell separated by the delimiter, which, in this case, is a forward slash.

You can customize this formula to change the order of the day and month values (eg. MM/DD) or to use a different delimiter character. You can also use the fill handle to copy this formula into other cells in your column to remove the year from multiple date values.
Related: How to Automatically Fill Sequential Data into Excel with the Fill Handle
Also read:
- [New] Making a Splash with YouTube Ad Banners & Thumbnails for 2024
- [New] Mastering Vocal Transformations High-Ranked App Options
- 2024 Approved Navigating and Interpreting Twitter Archives
- 2024 Approved Tier 5 Speedy Screen Recorders
- Complete Instructions to Obtain and Update Samsung's 960 EVO Drives on a Windows PC
- Downloading YouTube Videos in Compatible Formats for Presentations with Keynote
- Easy Installation: Brother MFC-7360N Driver Update & Downloads for Windows 10, 8 & E
- Effortless Driver Management in Windows - Get Started Today
- Fixing Device Compatibility Problems with Rainbow Six Extraction Launcher
- Full Guide to Fix iToolab AnyGO Not Working On Poco M6 Pro 5G | Dr.fone
- Get the Latest Logitech RX250 Drivers Here for Windows Users on OS 7/8/10
- In 2024, Unlock Your Honor 90 Pro Phone with Ease The 3 Best Lock Screen Removal Tools
- Latest NVIDIA RTX 2080 Super Driver Downloads for Windows 10 & 11
- Lenovo IdeaPad T430 Driver Downloads: Compatible with Windows 10, 8 & 7 - Quick Guide
- Mastering Instagram's Q&A Feature Beyond the Basics for 2024
- Professionelle Anleitung Für Den Einfachen Austausch Der Hardware Bei Lenovos All-in-One PCs
- Streamlit Splendor Hues and Highlights Technique for 2024
- Supercharge Gaming on Acer Predator Helios Nv GPUs with Latest Drivers
- Unleash Higher FPS with a New Asus 97N Pro Graphics Card for Gamers
- Title: Microsoft Excel Guide: Adjusting Dates by Removing a Year
- Author: David
- Created at : 2024-10-15 18:34:59
- Updated at : 2024-10-20 18:43:20
- Link: https://win-dash.techidaily.com/microsoft-excel-guide-adjusting-dates-by-removing-a-year/
- License: This work is licensed under CC BY-NC-SA 4.0.