Explore Underutilized Windows Utilities That Enhance Your PC Experience
Explore Underutilized Windows Utilities That Enhance Your PC Experience
Quick Links
- Adjust the Volume of Individual Apps
- Minimize the Blue Light Emission
- Automatically Lock Your Screen When You Move Away
- Automate Tasks With Task Scheduler
- Share Content Between Two Windows PCs
- Capture Screenshots and Record the Screen Using the Game Bar
Did you know you can natively adjust the volume of individual apps, minimize blue light emissions, and make Windows automatically lock your screen when you move away? These are some lesser-known Windows features that you might not have explored before. Let’s look at how you can use these features.
Adjust the Volume of Individual Apps
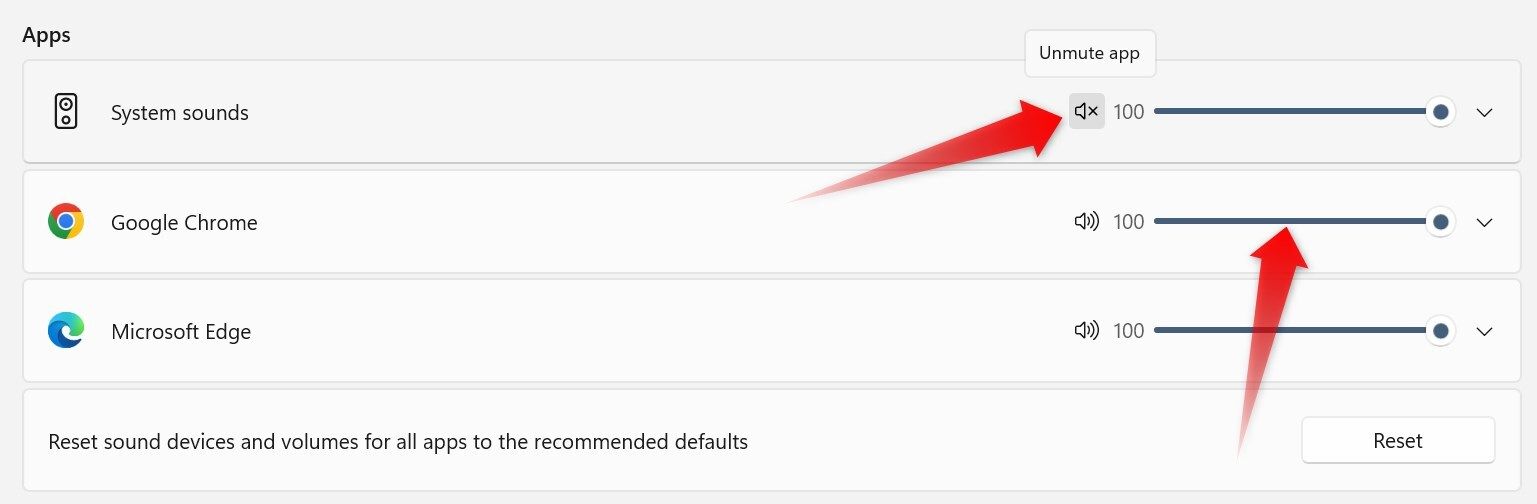
Windows allows you to adjust the volume of individual apps , a feature that many users rely on third-party apps like EarTrumpet for. You can manage the volume of individual apps by opening the Volume Mixer from the system tray or through the Settings app.
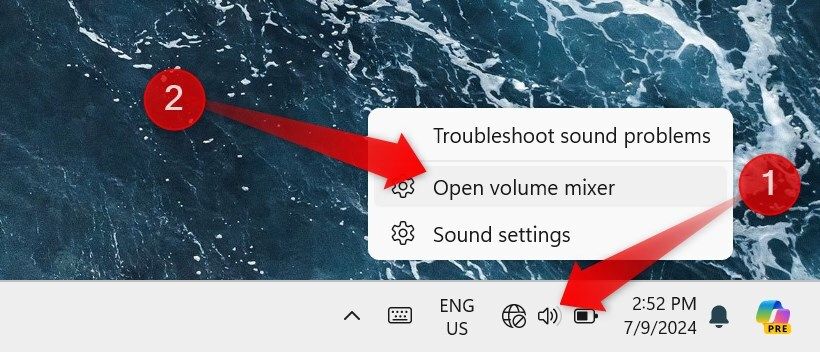
To access the Volume Mixer, right-click on the speaker icon in the system tray and select “Open Volume Mixer.” This will open the Volume Mixer settings in the Settings app.
Alternatively, click the sound button in the system tray, then click on the Select a Sound Output button.
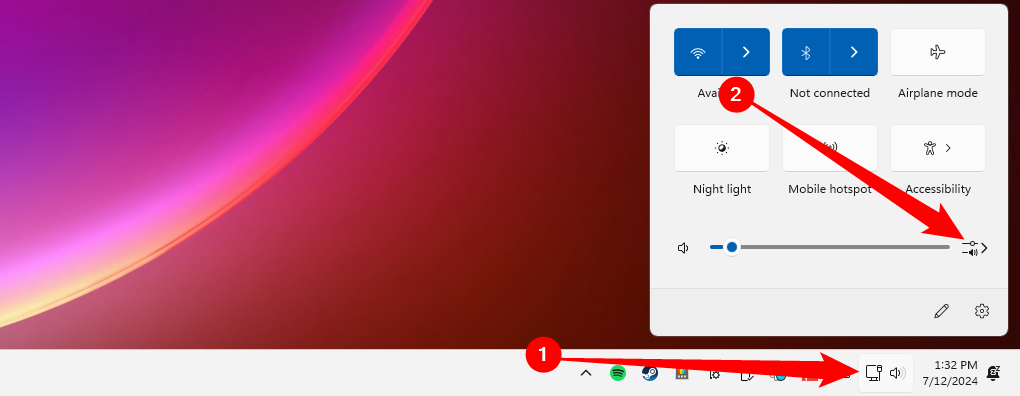
In the next window, scroll down to find the volume mixer.

You can also open this window directly by using the shortcut Win+Ctrl+V. Then, scroll down to adjust the volume of individual apps.
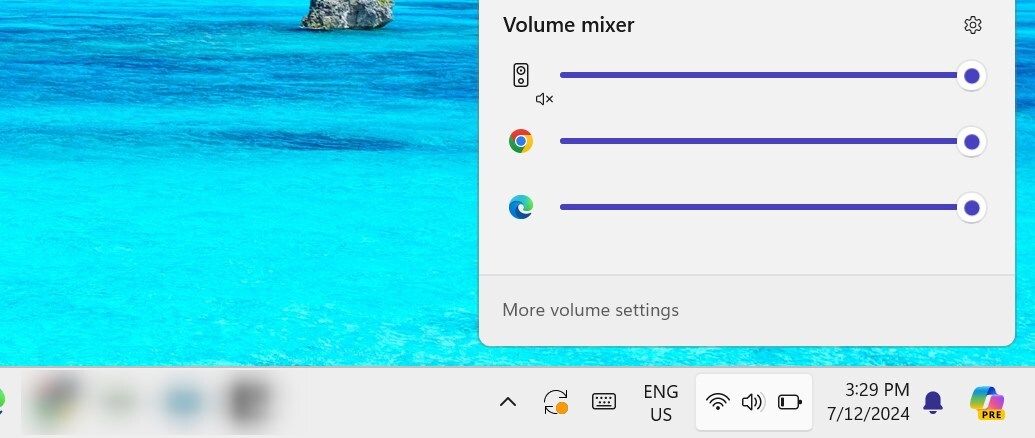
To directly open the Volume Mixer from the Settings app, open Settings, navigate to System > Sound, and click on “Volume Mixer.” In the Volume Mixer, you’ll see sliders to adjust the volume of each open app that produces sound. You can move these sliders right or left to adjust the volume or mute individual apps by clicking on the speaker icon beside each slider.
Minimize the Blue Light Emission
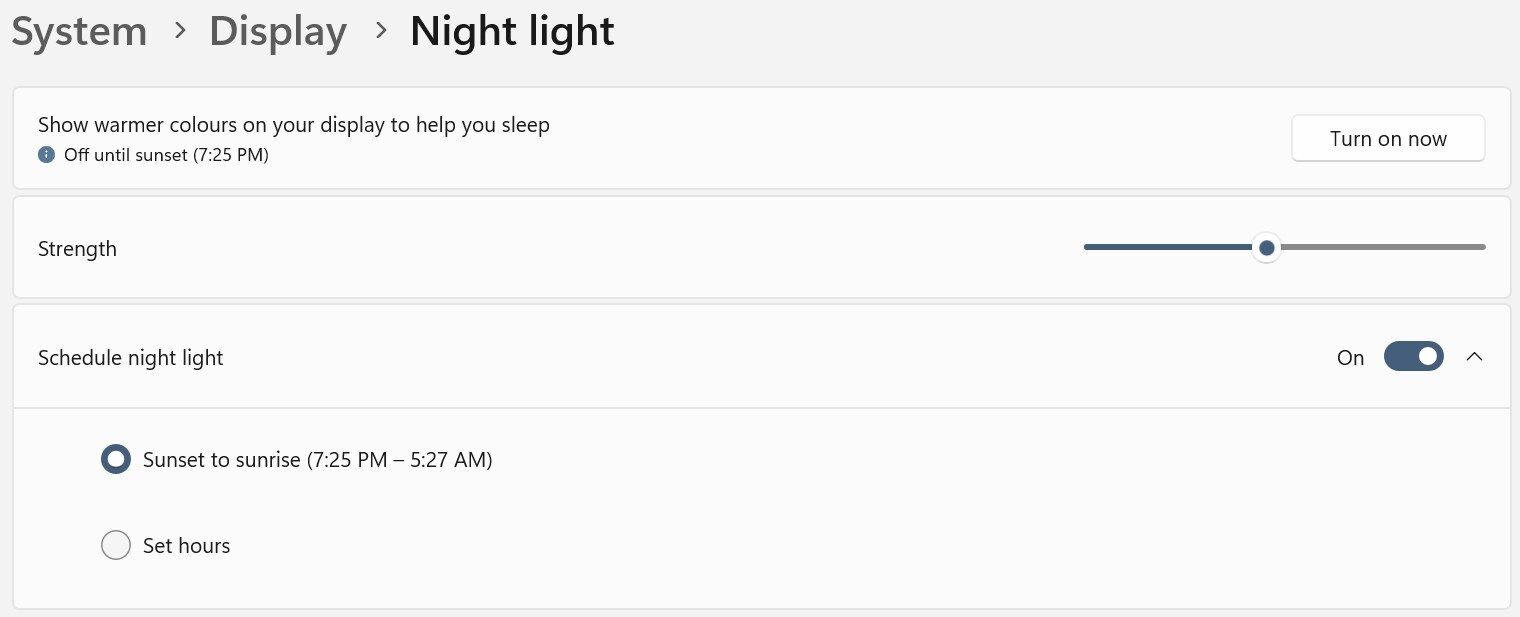
Have you ever found it harder to sleep after using your laptop at night? This happens because blue light emitted from the screen suppresses the production of melatonin, a hormone that makes you sleepy. Windows offers a solution with its Night Light feature , which reduces blue light emission, making the display easier on your eyes and less disruptive to your circadian rhythm.
To enable this feature, open the Settings app, go to System > Display, and turn on the toggle next to “Night Light.” To adjust the strength of blue light reduction, click on Night Light and adjust the slider. You can also schedule this feature to turn on automatically at sunset and off at sunrise or during specific hours.
To set a schedule, turn on the toggle next to “Schedule Night Light” and set your preferred hours.
Automatically Lock Your Screen When You Move Away
If you work in an office environment and often leave your laptop unattended, you’ll love the Dynamic Lock feature . This feature pairs your smartphone with your laptop, and whenever your paired smartphone moves out of range, the laptop notices and locks your screen in less than 30 seconds.
To use this feature, first pair your smartphone with your laptop. Open the Settings app, navigate to Bluetooth and Devices > Devices, and turn on the Bluetooth toggle. Then, turn on Bluetooth on your phone and click “Add Device” on your laptop. Select your smartphone from the list of available devices and follow the on-screen prompts to complete the pairing process.
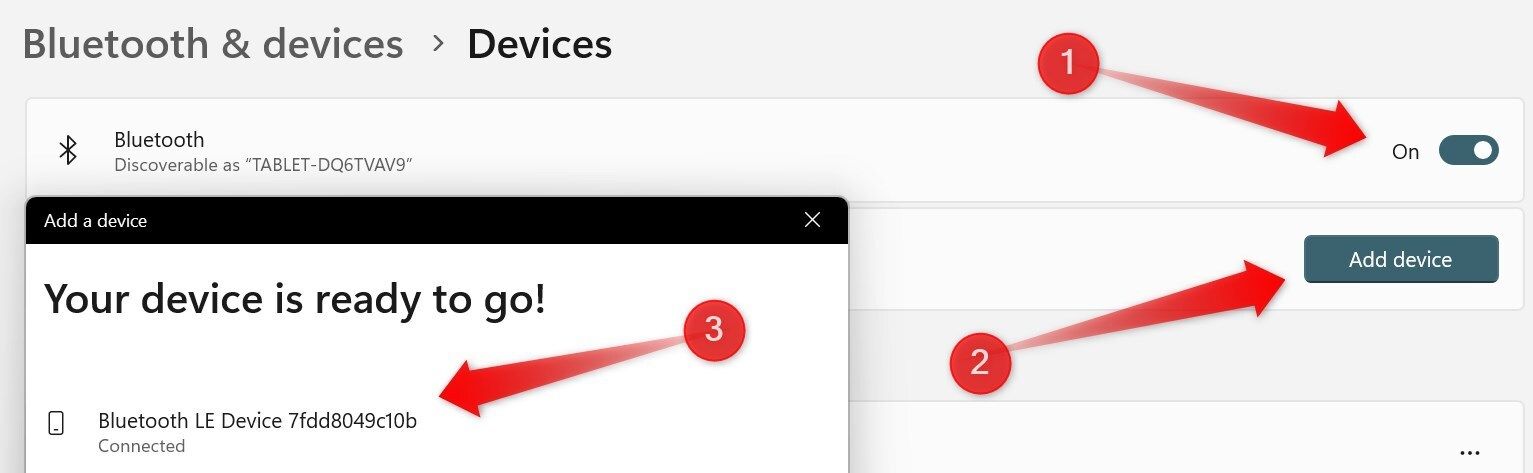
Once paired, select the “Accounts” tab on the left, go to “Sign-In Options,” scroll down and expand the “Dynamic Lock” section, and check the box next to “Allow Windows to lock your device automatically when you’re away.” Now, whenever your smartphone moves out of range (typically 30 feet), your laptop will automatically lock.

Automate Tasks With Task Scheduler
Task Scheduler is a useful but often overlooked utility in Windows. It allows you to schedule tasks to run at specific times or in response to certain events , helping you automate routine tasks, improve efficiency, and save time. You can define one or more triggers and specify the action that Windows needs to take when the triggers are activated.
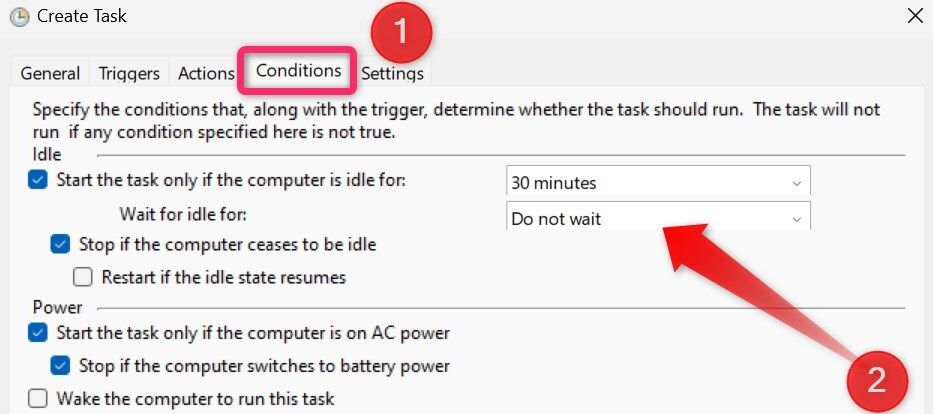
Also, you can set conditions to make sure that the automated tasks do not run during work hours and do not disrupt your workflow.
To use Task Scheduler, type “Task Scheduler” in Windows Search and open the Task Scheduler utility. Click on “Create Task” in the Actions pane on the right. Add a name and description for the task. Go to the “Triggers” tab, click “New” to select a trigger, and adjust the start time and other settings.
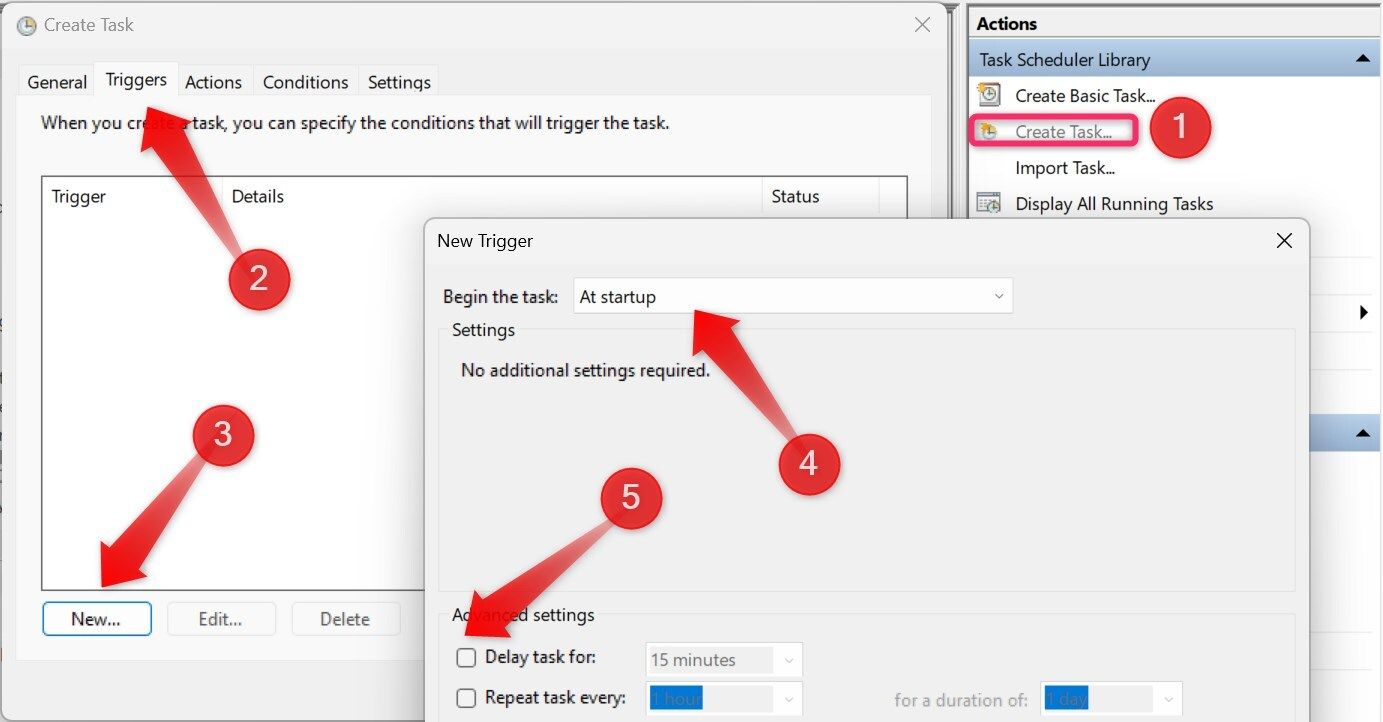
After that, navigate to the “Actions” tab, click “New,” define an action such as “Start a Program,” and add any additional arguments for advanced tasks. Then, go to the “Conditions” tab, and define conditions for when the task shouldn’t run. Once the task is properly configured, click “OK.”
Share Content Between Two Windows PCs
While we usually have various options to share files between a PC and a smartphone , things get a bit complicated when sharing content between two PCs. If both computers run Windows, and they both have a Bluetooth and Wi-Fi connection, you can use the Nearby Sharing feature for a seamless file transfer. To use this feature, enable the feature on both PCs and ensure they are connected to the internet.
Not every desktop will have a Bluetooth or Wi-Fi adapter, which makes this slightly more useful with laptops.
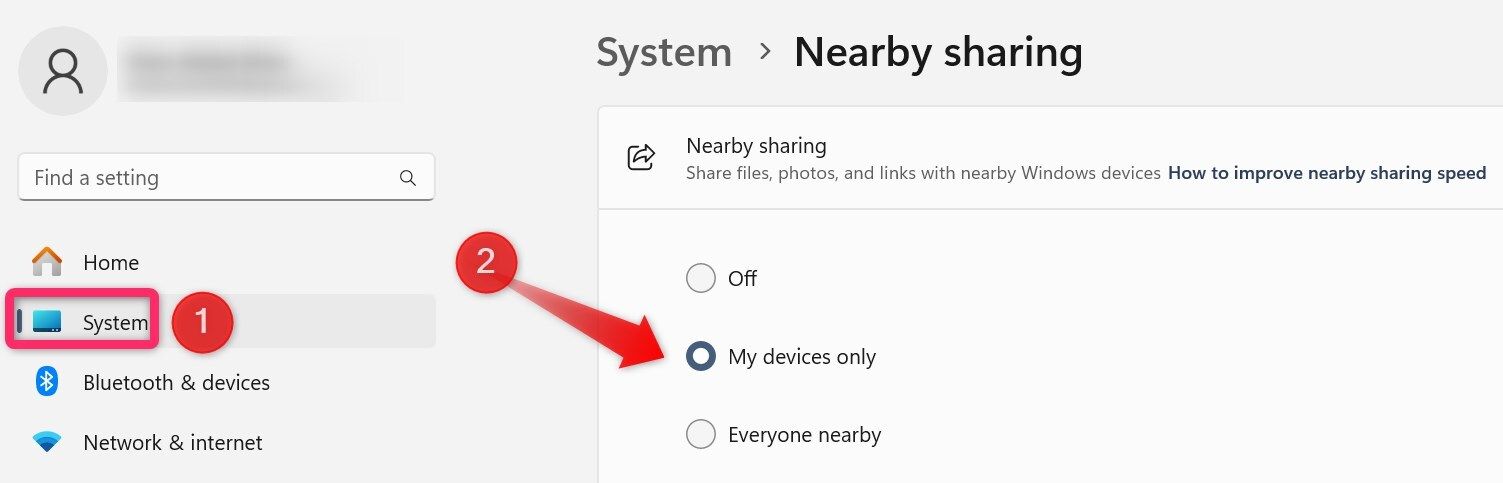
Open Settings, navigate to the “System” tab, and select “Nearby Sharing.” Choose “Everyone Nearby” or “My Devices Only,” which will enable Bluetooth on both laptops.
With Nearby Sharing enabled, right-click the file you want to share and select “Share.” In the Nearby Sharing window, choose the target laptop. The recipient will receive a notification to accept the file. Once they accept the file transfer notification, they will receive the file wirelessly.
Capture Screenshots and Record the Screen Using the Game Bar
If you often capture screenshots or record your screen using a third-party app, you may not have explored the Windows Game Bar tool yet. While designed primarily for capturing screenshots and recording gameplay, it also allows you to take screenshots and record your screen in other applications.
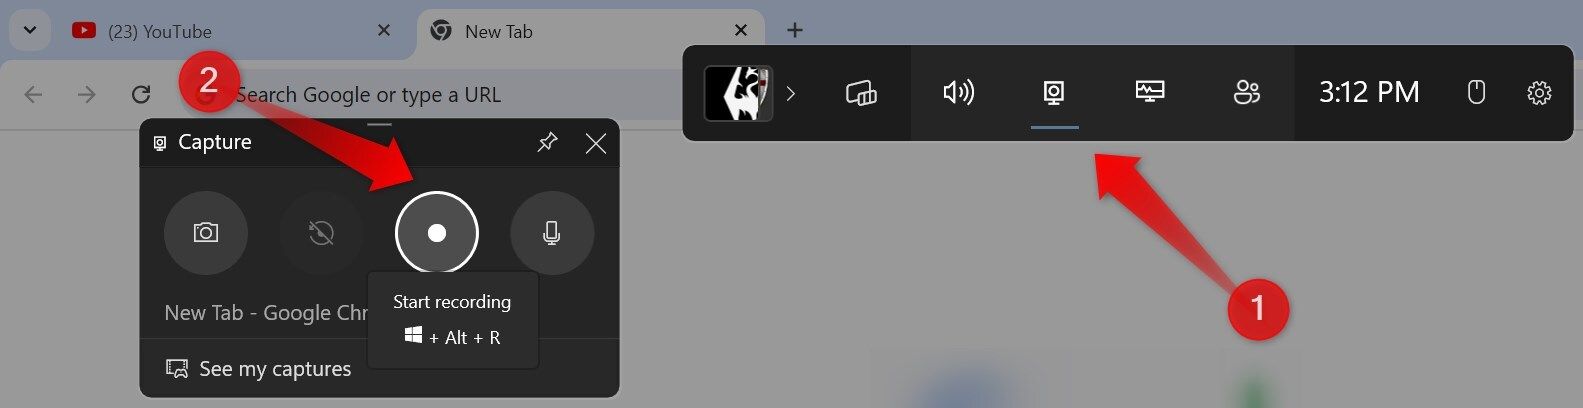
What I like the most about the Game Bar is its keyboard shortcut support, which makes it easy to use. Press Windows+G to open the Game Bar. You can start recording with Windows+Alt+R, mute or unmute the microphone with Windows+Alt+M, and capture screenshots with Windows+Alt+Prtscn(Print Screen). Also, you can easily access your captured screenshots and recordings with a single click.
The downside is that you can’t annotate screenshots and videos, crop screenshots, clip recordings, or screen record in File Explorer and on the desktop.
These are some of the best lesser-known Windows features that can help boost your workflow efficiency. If you haven’t tried them before or rely on third-party apps for similar tasks, give these native features a try to see if they can replace the unofficial apps. Also, share your favorite features with friends if you find them useful.
Also read:
- [DOWNLOAD] ASUS Z370-E Drivers | Quick & Easy
- [New] PS3 Experience on PC Leading Emulators Guide
- [Updated] The Expert Guide to Swift FB Profiling
- 10 Best Fake GPS Location Spoofers for ZTE Nubia Z60 Ultra | Dr.fone
- 2024 Approved IPhone's Role in the Revolution of Animated Image Sharing
- 3 Solutions to Find Your Honor X9a Current Location of a Mobile Number | Dr.fone
- Best Practices for Exporting and Backing Up Your Chat Data with ChatGPT
- Download the Canon DR-C225 Printer Driver: Compatible with Windows 11, 10 & 8
- Download the Comprehensive Driver Suite for Your Brother HL-L2360DW Printer
- GeForce RTX 3090 Driver Update Available - Compatible with Windows 10, 8 & 7
- Get the Latest Insignia NS-PCY5BMA2 Drivers for Compatible Windows Versions
- Get the Newest Intel Iris Xe Graphics Software Update on Windows 11
- Latest SAS Driver Versions for Windows Operating Systems: Windows 11, 8, & 7
- Optimizing Microsoft's Xbox Sound Setup
- Protect Your MacBook: Techniques for Accurate Heat Monitoring and Management
- Simple Steps: How to Quickly Update Your Windows Battery Drivers
- Step-by-Step Download of Latest Drivers for Your Nvidia Quadro RTX 8000 on Win 10, 8 or 7!
- Step-by-Step Guide: Upgrading Your Arduino USB Drivers for Windows 10/11
- Windows 11 Enhances Photos Application with Key Visual Interface Upgrades
- Title: Explore Underutilized Windows Utilities That Enhance Your PC Experience
- Author: David
- Created at : 2024-10-18 18:01:15
- Updated at : 2024-10-20 18:09:02
- Link: https://win-dash.techidaily.com/explore-underutilized-windows-utilities-that-enhance-your-pc-experience/
- License: This work is licensed under CC BY-NC-SA 4.0.