
Disabling Privacy Leaks: Hide Your Recent Files in Windows 11 Explore

Disabling Privacy Leaks: Hide Your Recent Files in Windows 11 Explore
Quick Links
- Manually Remove Recently Accessed Items
- Stop Windows From Keeping Recent Items History
- Clear the Entire History of Recent Items
Key Takeaways
- To manually remove recently accessed items from File Explorer, select the items you wish to delete, right-click, and select “Remove From Recent.”
- To prevent Windows from retaining a history of recent items in File Explorer, click on the “See More” menu, navigate to “Options,” and uncheck the boxes next to “Show Recently Used Files” and “Show Frequently Used Folders” in the Folder Options window.
- You cannot prevent Windows from saving recently accessed items in the Recent Items folder. To maintain privacy and erase this record, you need to clear them manually.
If you’re using a shared PC and don’t want Windows to show the files and folders you’ve recently accessed in File Explorer, you have several options. You can either remove specific items from the list, clear the entire list, or stop Windows from showing this history in File Explorer.
Manually Remove Recently Accessed Items
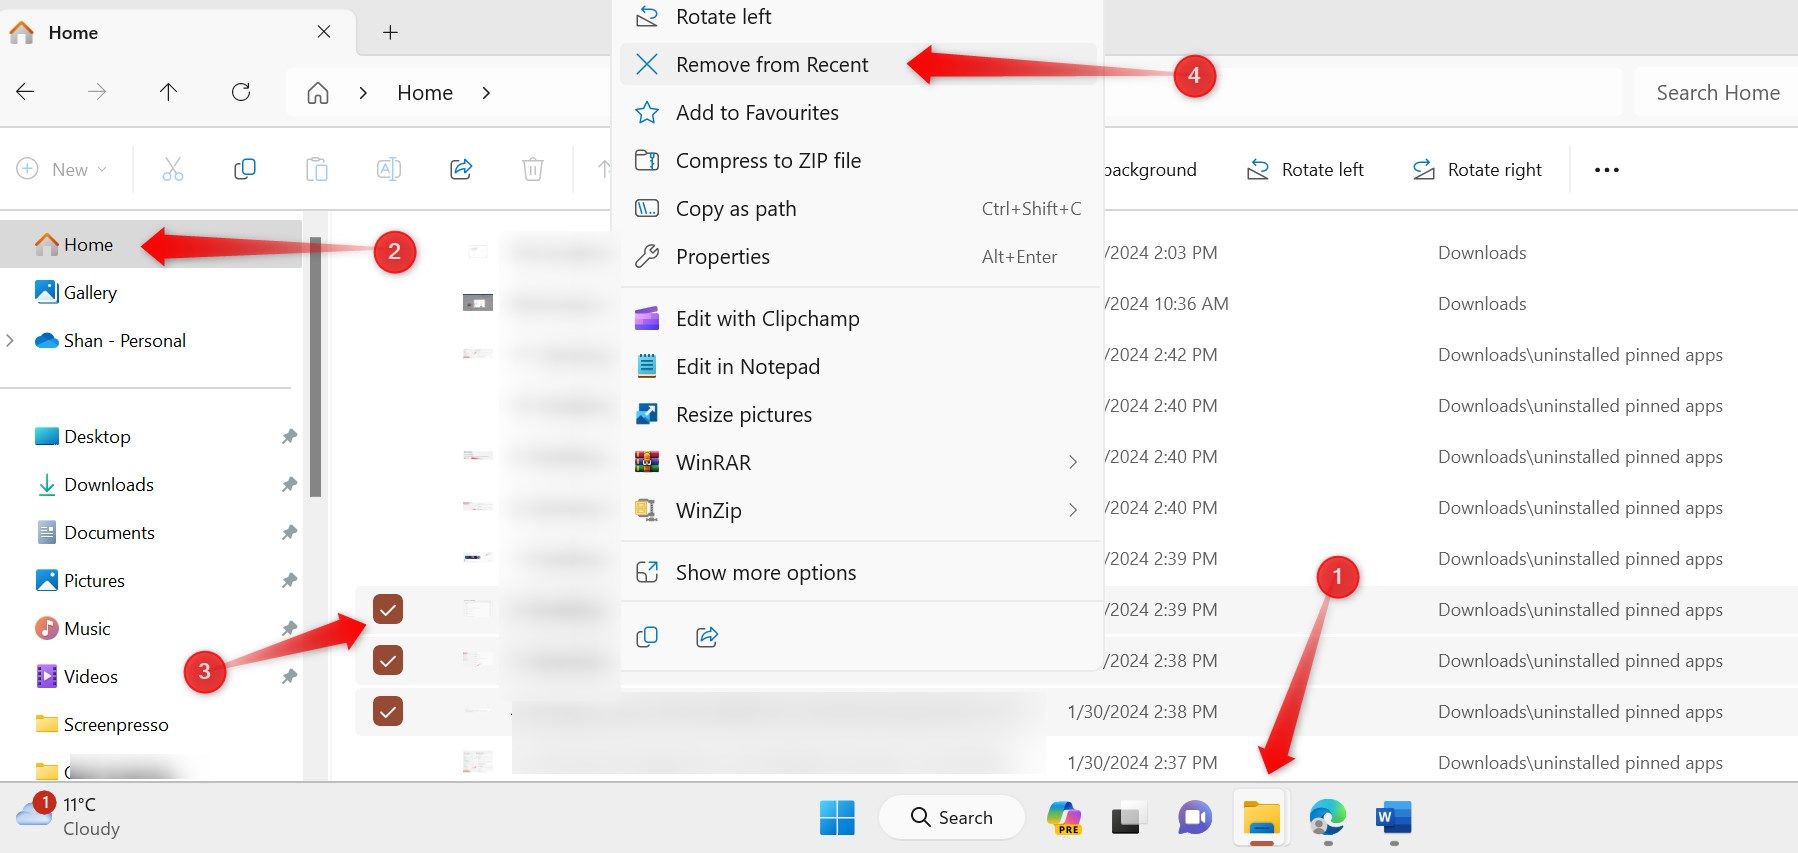
To selectively remove recently accessed files and folders, open File Explorer by clicking on the folder icon in the taskbar. Then, navigate to the “Home” tab on the left. Check the box(es) next to the files you want to remove from the history, right-click on the selected files, and select “Remove From Recent.”
To selectively remove items from the jump list of File Explorer, right-click on the File Explorer icon in the taskbar, right-click on the item you want to remove, and select “Remove From This List.”
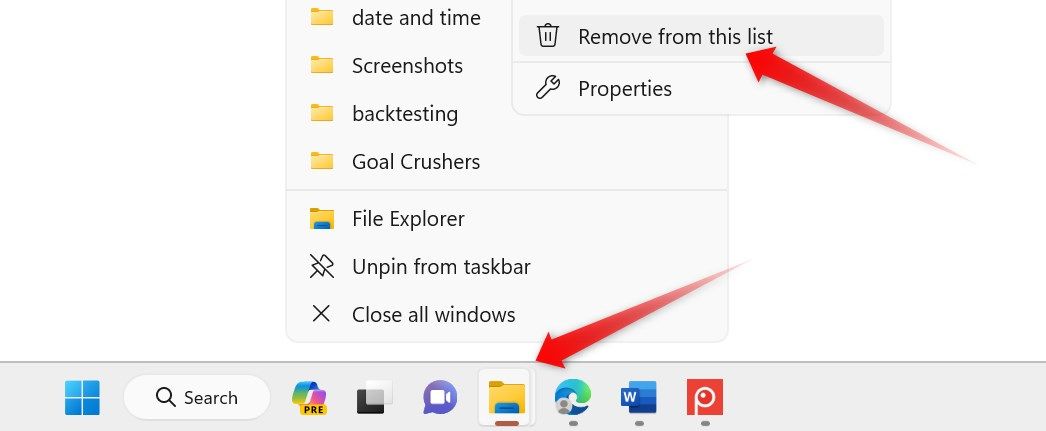
It’s important to note that removing items in this way only removes them from the Recent section in File Explorer and the jump list; they will remain intact in the Recent Items folder, where the record is stored. If you want to ensure others don’t know what files and folders you’ve accessed, remove them from there as well.
To do so, press Win+R, type %AppData%\Microsoft\Windows\Recent\ into the run box and click “OK.” This will open the Recent Items folder.
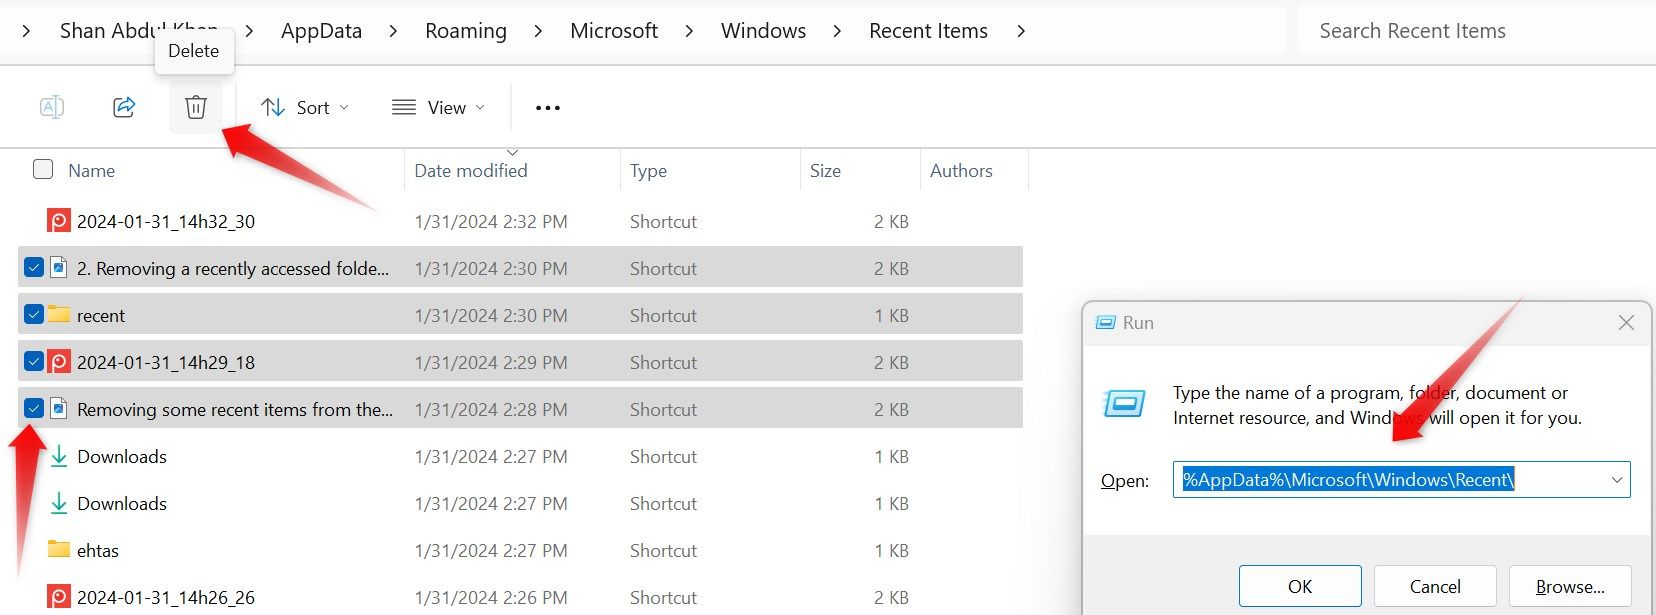
Check the boxes next to the recent files and folders you want to remove from the history and click on the recycle bin icon at the top to delete them permanently. If you want to delete all records, select all of them and click on the recycle bin.
Windows doesn’t display a confirmation popup when removing items from the Recent Items folder or Recent section in File Explorer, so proceed with caution while removing items.
Stop Windows From Keeping Recent Items History
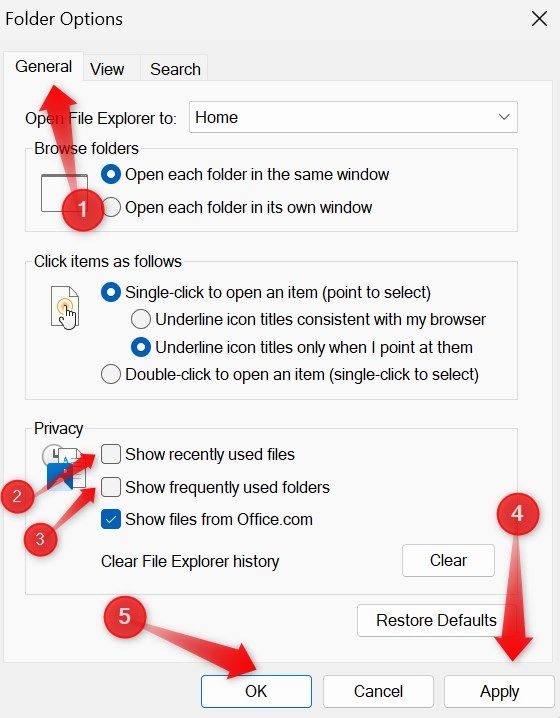
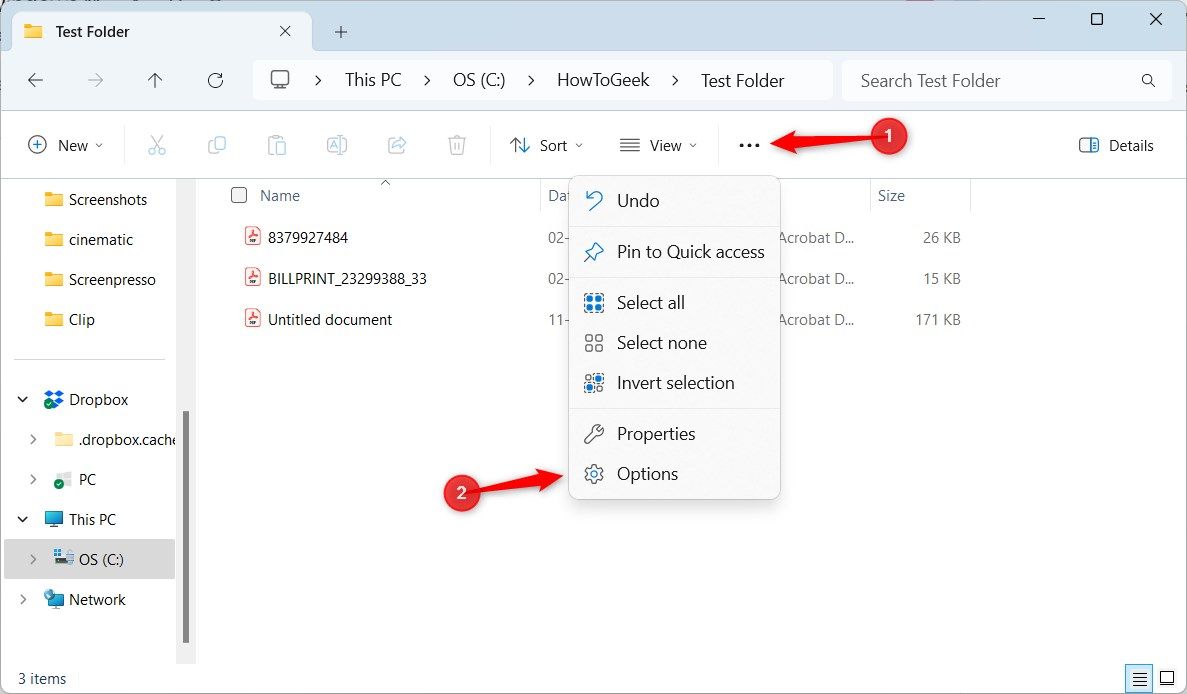
You can stop Windows from keeping a record of recently visited items in the Recent section of File Explorer. Open File Explorer, click on the See More menu, represented by three horizontal dots at the top, and select “Options.”
Navigate to the “General” tab in the Folder Options window and uncheck the boxes next to “Show Recently Used Files” and “Show Frequently Used Folders.” Click “Apply” and then “OK.”
While the above process stops Windows from displaying recently accessed items in the Recent section of File Explorer, it will still record them in the Recent Items folder. This means that anyone using your PC can still view those records. So, what’s the best way to maintain the privacy of this data?
The best way is to clear your File Explorer history after using your PC. Doing so will erase the entire history, ensuring no traces are left for anyone to see.
Clear the Entire History of Recent Items
There isn’t a dedicated feature in Windows that clears the history of your recently accessed items. Instead, you need to remove the entire File Explorer history to eliminate this record.
It’s important to note that clearing File Explorer history also removes other records, such as jump list records and searches made using File Explorer. However, if your goal is to prevent others from tracking your activity, why not remove every trace of the record by wiping out the File Explorer history?
To clear the File Explorer History, click on the folder icon on the taskbar to open File Explorer. Click on the See More menu, represented by three horizontal dots at the top, and select “Options.”
Navigate to the “General” tab in the Folder Options window and click the “Clear” button next to “Clear File Explorer History.”

By doing so, you will erase all the information, and File Explorer will start recording new actions from scratch, ensuring your privacy. Besides clearing your history, you can customize many other settings in Windows 11 to protect your privacy.
Also read:
- [New] 2024 Approved Discover the Art of YouTube Playlist Shuffling
- [New] In 2024, Achieve More Engagement on YouTube Learn the Best Thumbnail Size
- [New] Perfecting Text in After Effects The Best 10
- [New] The Chief's Guide to Superior Cloud Vaults for 2024
- Comprehensive Guide to Downloading and Updating Razer Drivers for All Windows Versions
- Easy Steps to Customize Languages for Specific Apps on Your Android Device
- Fatigue Occurs Due to Cyclic Loading, Leading to Crack Initiation and Growth over Time.
- How to Fix the 'iGFXem Module Not Functioning' Issue - Solutions Inside!
- How To Transfer WhatsApp From iPhone XR to Android? | Dr.fone
- In 2024, How to Bypass Android Lock Screen Using Emergency Call On Motorola Moto G14?
- In 2024, Prevent Cross-Site Tracking on Vivo Y200 and Browser | Dr.fone
- Installing the Latest Logitech C920 Webcam Software on Windows 11, 10 & 8
- Latest Lenovo Driver Packs: Free Download & Installation Guide for Windows 10
- Liver Transplantation in BTC Patients Requires Strict Criteria to Be Met Due to Cancer Recurrence Concerns.
- Optimizing Video Quality YouTube to MPEG Conversion Strategies for 2024
- Overcoming Realtek WLAN Driver Challenges on Windows 11, Windows 10 & 7 Platforms
- Step-by-Step Tutorial on Utilizing OneDrive's Features for Effortless Dual Computer Syncing
- Update Your ASUS Maximus X Hero Graphics Card: Step-by-Step Guide
- Update Your HP DeskJet 3755 Printer on Windows 10, 8 or 7 - Download Driver Now!
- Title: Disabling Privacy Leaks: Hide Your Recent Files in Windows 11 Explore
- Author: David
- Created at : 2024-10-15 16:39:38
- Updated at : 2024-10-20 17:54:30
- Link: https://win-dash.techidaily.com/disabling-privacy-leaks-hide-your-recent-files-in-windows-11-explore/
- License: This work is licensed under CC BY-NC-SA 4.0.