
1. Efficient Strategies for Organizing Excel Spreadsheets: Sorting & Filtering Techniques

1. Efficient Strategies for Organizing Excel Spreadsheets: Sorting & Filtering Techniques
Quick Links
- How to Sort Data in an Excel Spreadsheet
- How to Filter Data in Excel
- How to Filter Data from Multiple Columns at Once
Sorting and filtering data offers a way to cut through the noise and find (and sort) just the data you want to see. Microsoft Excel has no shortage of options to filter down huge datasets into just what’s needed.
How to Sort Data in an Excel Spreadsheet
In Excel, click inside the cell atop the column you want to sort.
In our example, we’re going to click cell D3 and sort this column by salary.

From the “Data” tab on top of the ribbon, click “Filter.”

Atop each column, you’ll now see an arrow. Click the arrow of the column you wish to sort to bring up a menu that enables us to sort or filter the data.
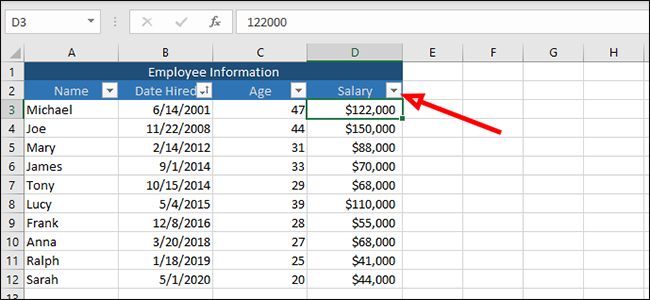
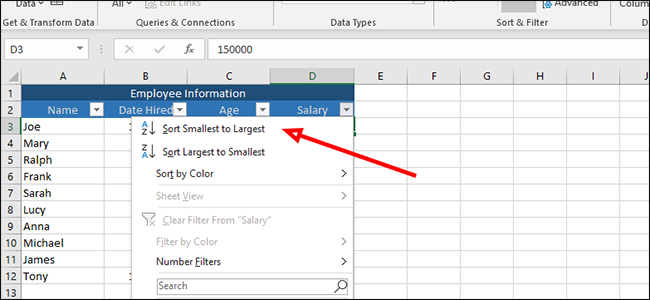
The first and most obvious way to sort data is from smallest to largest or largest to smallest, assuming you have numerical data.
In this case, we’re sorting salaries, so we’ll sort from smallest to largest by clicking the top option.
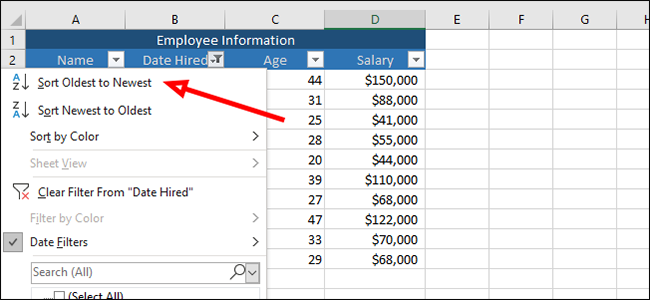
We can apply the same sorting to any of the other columns, sorting by the date of hire, for example, by selecting the “Sort Oldest to Newest” option in the same menu.
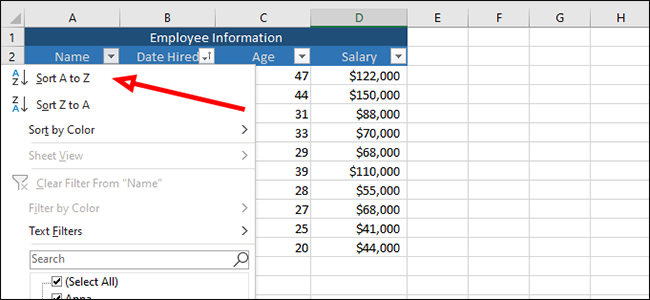
These sorting options also work for the age and name columns. We can sort by oldest to youngest in age, for example, or arrange employee names alphabetically by clicking the same arrow and choosing the appropriate option.
How to Filter Data in Excel
Click the arrow next to “Salary” to filter this column. In this example, we’re going to filter out anyone who makes more than $100,000 per year.

Because our list is short, we can do this a couple of ways. The first way, which works great in our example, is just to uncheck each person who makes more than $100,000 and then press “OK.” This will remove three entries from our list and enables us to see (and sort) just those that remain.
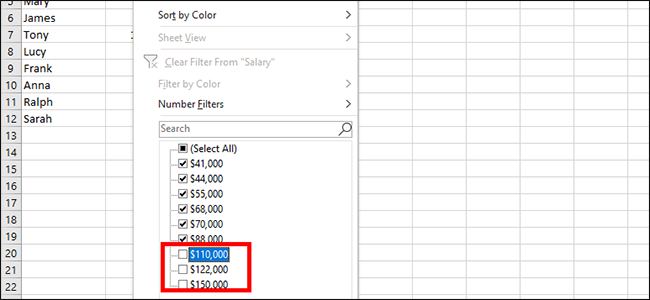
There’s another way to do this. Let’s click the arrow next to “Salary” once more.

This time we’ll click “Number Filters” from the filtering menu and then “Less Than.”
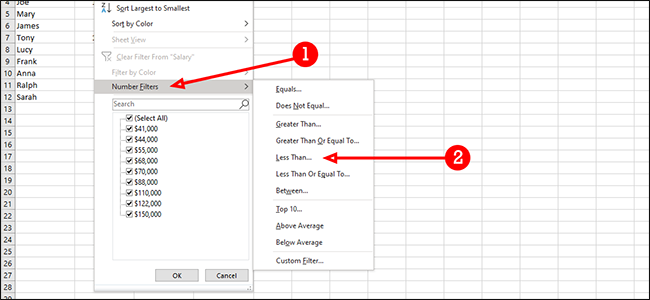
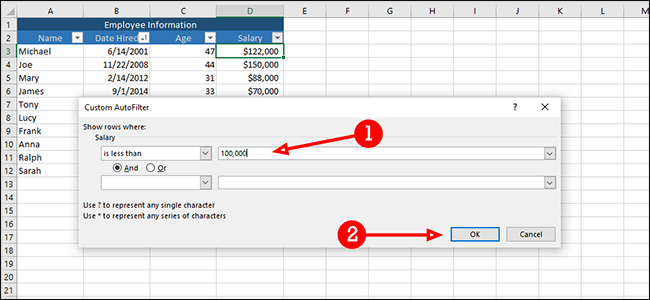
Here we can also filter our results, removing anyone who makes over $100,000 per year. But this way works much better for large data sets where you might have to do a lot of manual clicking to remove entries. To the right of the dropdown box that says “is less than,” enter “100,000” (or whatever figure you want to use) and then press “OK.”
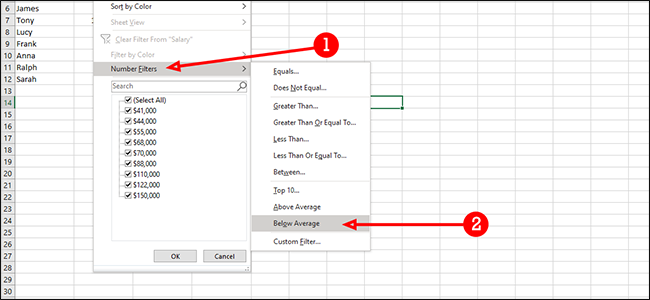
We can use this filter for a number of other reasons, too. For example, we can filter out all salaries that are above average by clicking “Below Average” from the same menu (Number Filters > Below Average).
We can also combine filters. Here we’ll find all salaries greater than $60,000, but less than $120,000. First, we’ll select “is greater than” in the first dropdown box.
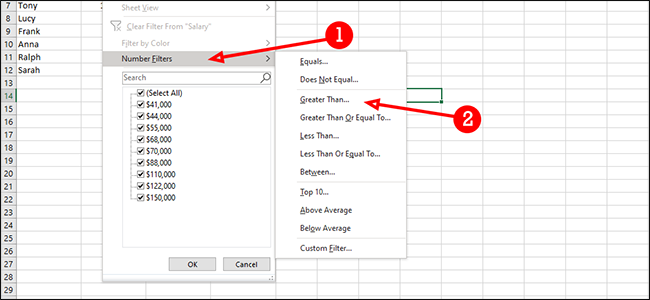
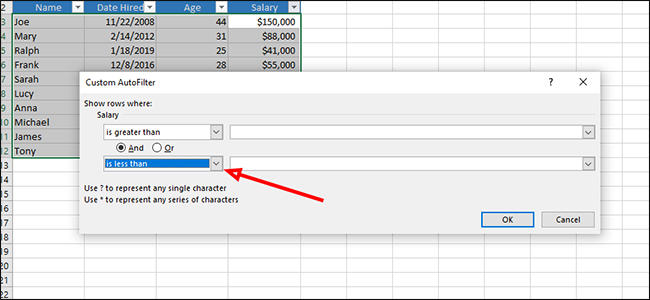
In the dropdown below the previous one, choose “is less than.”
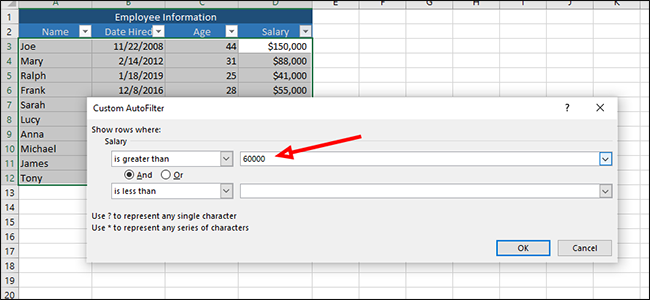
Next to “is greater than” we’ll put in $60,000.
Next to “is less than” add $120,000.
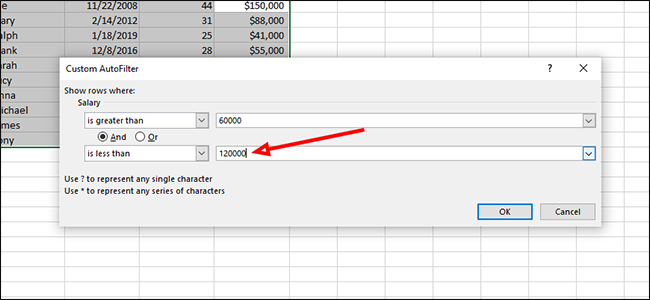
Click “OK” to filter the data, leaving only salaries greater than $60,000 and less than $120,000.

How to Filter Data from Multiple Columns at Once
In this example, we’re going to filter by date hired, and salary. We’ll look specifically for people hired after 2013, and with a salary of less than $70,000 per year.
Click the arrow next to “Salary” to filter out anyone who makes $70,000 or more per year.

Click “Number Filters” and then “Less Than.”

Add “70,000” next to “is less than” and then press “OK.”

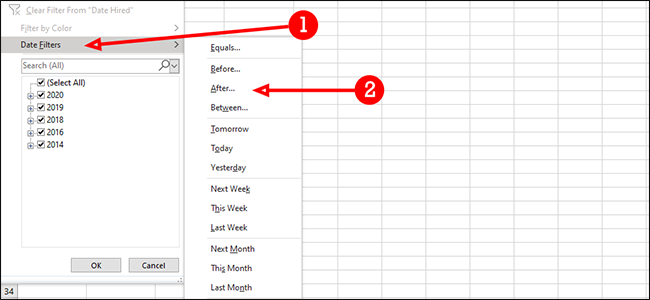
Next, we’re going to filter by the date each employee was hired, excluding those hired after 2013. To get started, click the arrow next to “Date Hired” and then choose “Date Filters” and then “After.”
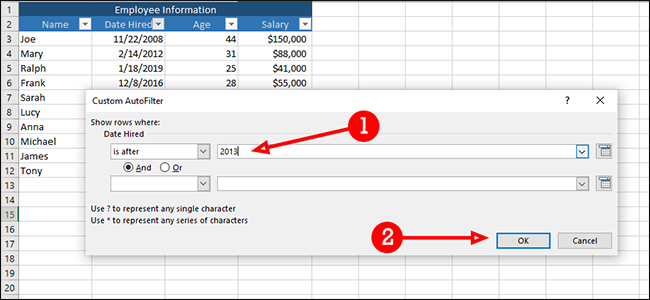
Type “2013” into the field to the right of “is after” and then press “OK.” This will leave you only with employees who both make less than $70,000 per year who and were hired in 2014 or later.
Excel has a number of powerful filtering options, and each is as customizable as you’d need it to be. With a little imagination, you can filter huge datasets down to only the pieces of information that matter.
Also read:
- [New] Unrivaled 7 Best Virtual Meetings Security-Centric Ranking
- [Updated] In 2024, Windows 11 Gamers' Script to Save Playbacks
- Comprehensive Guide to Resolving Civilization VI Performance Hiccups
- Connect with Ease: A Comprehensive Guide to the Logitech MX Master Software Installation Process
- Crafting YouTube Videos: Leveraging ChatGPT for Scripts
- Effective Solutions for LG USB Connectivity Problems in Windows 10, 8, or 7
- Effective Solutions to Address Logitech G930 Audio Drivers Issues Under Windows OS
- Get the Newest Insignia Bluetooth Driver Updates for Windows Systems
- Guide: Linking Your PSVR Headset with Your Computer - A Step-by-Step Tutorial
- In 2024, Top 10 Fingerprint Lock Apps to Lock Your Realme C51 Phone
- Install Official Ricoh Printer Drivers on Windows - Step-by-Step Guide
- Maximizing YouTube Earnings Master the Art with 500 Subscribers for 2024
- Microsoft's Latest Audio Drivers for Windows: Free Downloads Available Now
- Prevention of Fetal Alcohol Syndrome for 2024
- Probabilistic Methods in Advanced Seismic Analysis Account for Uncertainties and Provide a Comprehensive Risk Assessment of Structural Behavior During Earthquakes
- Quick Download of ASUS Touchpad Drivers Compatible with Windows 11 - Easy Troubleshooting Included
- The Economical Enthusiast's Guide to Game Recording
- Ultimate guide to get the meltan box pokemon go For Nokia XR21 | Dr.fone
- Updated Zexmo Bluetooth Adapter Support for Windows Users (Win11, Win7, and Win8)
- Title: 1. Efficient Strategies for Organizing Excel Spreadsheets: Sorting & Filtering Techniques
- Author: David
- Created at : 2024-10-15 16:57:01
- Updated at : 2024-10-20 18:12:00
- Link: https://win-dash.techidaily.com/1-efficient-strategies-for-organizing-excel-spreadsheets-sorting-and-filtering-techniques/
- License: This work is licensed under CC BY-NC-SA 4.0.